Who Took the Cookie From the Cookie-Jar? Session Management in Scraping
Memoryless Protocol Need for Session Management
HTTP is a stateless (or memoryless) protocol, meaning it does not inherently retain information about previous requests or sessions. So, how does a server manage simultaneous sessions with multiple clients? This is where **session management** comes in.
To track sessions, the server assigns each client a unique “fingerprint,” typically in the form of a small piece of data called a **cookie**. This cookie is sent back to the server with every subsequent request, enabling the server to identify and maintain the session context.
For web scraping, where a browser may not be used, mimicking session management—such as storing and sending cookies with each request—is often critical for successful interactions with the website.
Scraping Fool Unique Challenges Scraping Financial Web-Sites
**Unique Challenges in Scraping Motley Fool’s Earnings Call Transcripts**
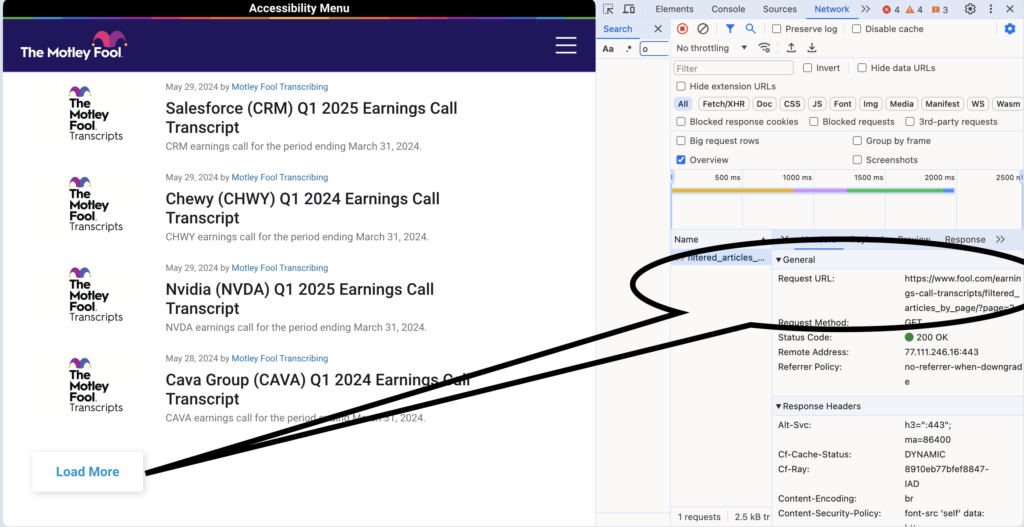
Motley Fool’s Earnings Call Transcripts page operates as a Single Page Application (SPA), where only 20 titles load initially, and more titles can be dynamically fetched by scrolling and clicking the “Load More” button. Behind the scenes, this functionality leverages a REST API endpoint (`filtered_articles_by_page/`) that provides additional content. To scrape such SPAs effectively, session management becomes crucial, as REST API requests require headers, including session cookies, which the browser automatically handles during normal usage.
Using browser developer tools, we can uncover the API endpoint and its request details. Copying the API request via “Copy as cURL” allows us to replicate it using Python’s `requests` library. By setting headers such as `User-Agent` and `Cookie`, we can authenticate your requests and fetch pages programmatically. Combining these steps, we can accumulate content across pages, extract transcript URLs and titles, and save full transcripts efficiently. This approach forms the basis for building a robust scraper for Motley Fool’s vast transcript collection.
Observe the network requests that are made. Can you find filtered_articles_by_page/?
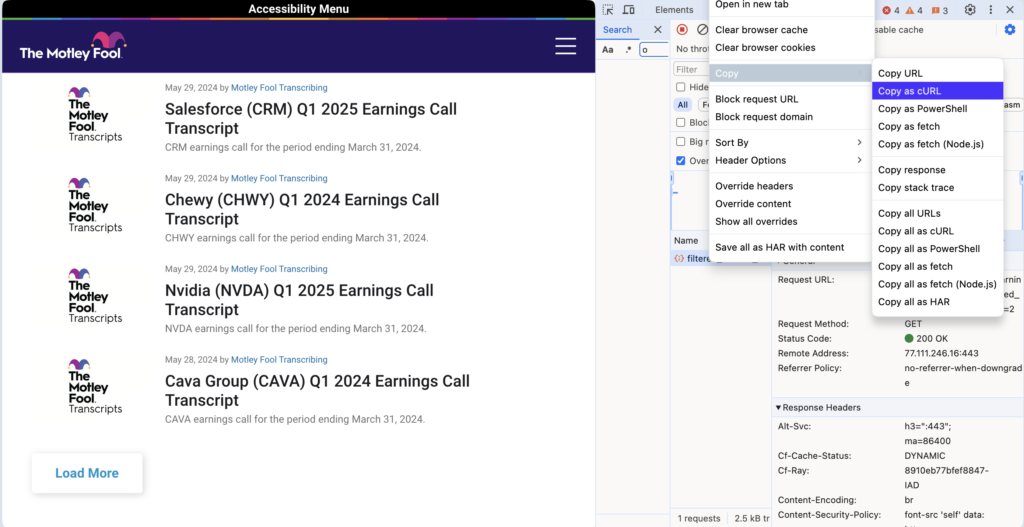
Here is the cURL request mimicking the REST API call “under the hood” of the web-page.
curl 'https://www.fool.com/earnings-call-transcripts/filtered_articles_by_page/?page=2' \
-H 'accept: */*' \
-H 'accept-language: en-US,en;q=0.9' \
-H 'cookie: __gads=ID=cf780f167b238800:T=1716807838:RT=1716807838:S=ALNI_MYpbhjLpTZBFXkxImlqUPuqV2tQQQ; __eoi=ID=7c7662471063c10d:T=1716807838:RT=1717178637:S=AA-Afja2nU7mEA-fuyorwkgnPk7j; OptanonAlertBoxClosed=2024-05-31T18:04:06.100Z; eupubconsent-v2=CP_d7iQP_d7iQAcABBENA3EgAAAAAAAAACiQAAAAAAAA.YAAAAAAAAAAA; sessionid=5kl8jmdmsgf3zudrk6k0mddf4gsebdwh; cf_clearance=5A0SbTbHIWTcDCzDg7JTB8G6gQ727lPdAca8V4eKOpQ-1717933880-1.0.1.1-oaWRIaUD1Qr2dKA2s1oUvR09OLyZh0neBcBVJJqdmjUgOUQRjd2XYGvjXkbp0acQLENn89LE9T_UnKzyb04m3A; OptanonConsent=isGpcEnabled=0&datestamp=Sun+Jun+09+2024+17%3A21%3A21+GMT%2B0530+(India+Standard+Time)&version=202405.1.0&browserGpcFlag=0&isIABGlobal=false&hosts=&consentId=6d2f3605-db22-4f40-b460-1c0c910b1b91&interactionCount=2&landingPath=NotLandingPage&groups=C0002%3A0%2CC0004%3A0%2CC0003%3A0%2CC0001%3A1%2CV2STACK42%3A0&geolocation=SG%3B&isAnonUser=1&AwaitingReconsent=false&intType=2; Visit=visit=df301d21-d4b3-4d79-a6be-c88c658e9dfc&first_article_in_session=0&first_marketing_page=0; Visitor=uid=&username=&account=®istered=false&ecapped=false&dskPrf=false&version=7&visits=4&visitor=298bccb7-6d49-40d2-bccf-82978ce0b884' \
-H 'priority: u=1, i' \
-H 'referer: https://www.fool.com/earnings-call-transcripts/' \
-H 'sec-ch-ua: "Chromium";v="124", "Opera";v="110", "Not-A.Brand";v="99"' \
-H 'sec-ch-ua-mobile: ?0' \
-H 'sec-ch-ua-platform: "macOS"' \
-H 'sec-fetch-dest: empty' \
-H 'sec-fetch-mode: cors' \
-H 'sec-fetch-site: same-origin' \
-H 'user-agent: Mozilla/5.0 (Macintosh; Intel Mac OS X 10_15_7) AppleWebKit/537.36 (KHTML, like Gecko) Chrome/124.0.0.0 Safari/537.36 OPR/110.0.0.0' \
-H 'x-requested-with: fetch'
And here is the same call made by using the requests library in Python.
import requests
url = 'https://www.fool.com/earnings-call-transcripts/filtered_articles_by_page/?page=2'
headers = {
'accept': '*/*',
'accept-language': 'en-US,en;q=0.9',
'cookie': '__gads=ID=cf780f167b238800:T=1716807838:RT=1716807838:S=ALNI_MYpbhjLpTZBFXkxImlqUPuqV2tQQQ; sessionid=56q1rnvexhexel2fnf09c07yp3mrdp6o; cf_clearance=fle0QL0LH3Tc9fgIWEQ9UxUY9H2PpJwZI9ThR3E07LI-1717178631-1.0.1.1-vaaZWQmq8.KrWi.mY8OJ.uq7AhLjuH1c8KJ9MXvM_ExWuMZHYrhfzwv7CrfV_d7uONOmS3HHmcJNLdBo01lUCQ; __eoi=ID=7c7662471063c10d:T=1716807838:RT=1717178637:S=AA-Afja2nU7mEA-fuyorwkgnPk7j; Visit=visit=5832172d-76a7-4aa8-9ecf-a79f254abebd&first_article_in_session=0&first_marketing_page=0; Visitor=uid=&username=&account=®istered=false&ecapped=false&dskPrf=false&version=7&visits=2&visitor=298bccb7-6d49-40d2-bccf-82978ce0b884; OptanonAlertBoxClosed=2024-05-31T18:04:06.100Z; eupubconsent-v2=CP_d7iQP_d7iQAcABBENA3EgAAAAAAAAACiQAAAAAAAA.YAAAAAAAAAAA; ct=1; OptanonConsent=isGpcEnabled=0&datestamp=Fri+May+31+2024+23%3A42%3A24+GMT%2B0530+(India+Standard+Time)&version=202405.1.0&browserGpcFlag=0&isIABGlobal=false&hosts=&consentId=6d2f3605-db22-4f40-b460-1c0c910b1b91&interactionCount=2&landingPath=NotLandingPage&groups=C0002%3A0%2CC0004%3A0%2CC0003%3A0%2CC0001%3A1%2CV2STACK42%3A0&geolocation=SG%3B&isAnonUser=1&AwaitingReconsent=false&intType=2',
'priority': 'u=1, i',
'referer': 'https://www.fool.com/earnings-call-transcripts/',
'sec-ch-ua': '"Chromium";v="124", "Opera";v="110", "Not-A.Brand";v="99"',
'sec-ch-ua-mobile': '?0',
'sec-ch-ua-platform': '"macOS"',
'sec-fetch-dest': 'empty',
'sec-fetch-mode': 'cors',
'sec-fetch-site': 'same-origin',
'user-agent': 'Mozilla/5.0 (Macintosh; Intel Mac OS X 10_15_7) AppleWebKit/537.36 (KHTML, like Gecko) Chrome/124.0.0.0 Safari/537.36 OPR/110.0.0.0',
'x-requested-with': 'fetch'
}
response = requests.get(url, headers=headers)
if response.status_code == 200:
print(response.text) # or process the response as needed
else:
print(f'Failed to retrieve data: {response.status_code}')
We can expand on this code to include features such as:
- Use session manager to handle cookie implicitly.
- Scrape the full transcripts given a range of page numbers.
- Save scraped transcripts to disk.
Here is what the sample code looks like with all these features implemented.
	import requests
import html
from lxml import etree

# Function to clean file name
def clean_filename(title):
    return "".join(c if c.isalnum() or c in " ._-()" else "_" for c in title)

# Define the number of pages to retrieve
i = 402
n = 2

# Step 1: Create a session
session = requests.Session()

# Step 2: Visit the first page to set cookies
initial_url = 'https://www.fool.com/earnings-call-transcripts/'
response = session.get(initial_url, headers={
    'accept': '*/*',
    'accept-language': 'en-US,en;q=0.9',
    'referer': 'https://www.fool.com/',
    'sec-ch-ua': '"Chromium";v="124", "Opera";v="110", "Not-A.Brand";v="99"',
    'sec-ch-ua-mobile': '?0',
    'sec-ch-ua-platform': '"macOS"',
    'sec-fetch-dest': 'empty',
    'sec-fetch-mode': 'cors',
    'sec-fetch-site': 'same-origin',
    'user-agent': 'Mozilla/5.0 (Macintosh; Intel Mac OS X 10_15_7) AppleWebKit/537.36 (KHTML, like Gecko) Chrome/124.0.0.0 Safari/537.36 OPR/110.0.0.0',
})

# Check if the initial request was successful
if response.status_code == 200:
    print("Initial request successful. Cookies set.")

    # Prepare to accumulate HTML content
    accumulated_html = '<html><head><title>Earnings Call Transcripts</title></head><body>'

    # Step 3: Loop through pages to gather content
    for page in range(i, n + i):
        next_url = f'https://www.fool.com/earnings-call-transcripts/filtered_articles_by_page/?page={page}'
        response = session.get(next_url, headers={
            'accept': '*/*',
            'accept-language': 'en-US,en;q=0.9',
            'referer': 'https://www.fool.com/earnings-call-transcripts/',
            'sec-ch-ua': '"Chromium";v="124", "Opera";v="110", "Not-A.Brand";v="99"',
            'sec-ch-ua-mobile': '?0',
            'sec-ch-ua-platform': '"macOS"',
            'sec-fetch-dest': 'empty',
            'sec-fetch-mode': 'cors',
            'sec-fetch-site': 'same-origin',
            'user-agent': 'Mozilla/5.0 (Macintosh; Intel Mac OS X 10_15_7) AppleWebKit/537.36 (KHTML, like Gecko) Chrome/124.0.0.0 Safari/537.36 OPR/110.0.0.0',
            'x-requested-with': 'fetch'
        })

        if response.status_code == 200:
            # Parse the JSON response
            data = response.json()

            # Extract the HTML content
            raw_html = data.get('html', '')

            # Unescape the HTML content
            clean_html = html.unescape(raw_html)

            # Accumulate the HTML content
            accumulated_html += clean_html
        else:
            print(f'Failed to retrieve page {page}: {response.status_code}')

    # Close the accumulated HTML content
    accumulated_html += '</body></html>'

    # Parse the accumulated HTML content
    tree = etree.HTML(accumulated_html)

    # Extract all transcript URLs and titles
    transcripts = tree.xpath('//div[@class="page"]//div[contains(@class, "flex")]')

    for transcript in transcripts:
        # Extract URL
        url = transcript.xpath('.//a[starts-with(@href, "/earnings")]/@href')[0]
        full_url = f'https://www.fool.com{url}'

        # Extract title
        title = transcript.xpath('.//h5/text()')[0]
        clean_title = clean_filename(title)

        # Fetch transcript page
        transcript_response = session.get(full_url, headers={
            'accept': '*/*',
            'accept-language': 'en-US,en;q=0.9',
            'referer': 'https://www.fool.com/earnings-call-transcripts/',
            'sec-ch-ua': '"Chromium";v="124", "Opera";v="110", "Not-A.Brand";v="99"',
            'sec-ch-ua-mobile': '?0',
            'sec-ch-ua-platform': '"macOS"',
            'sec-fetch-dest': 'empty',
            'sec-fetch-mode': 'cors',
            'sec-fetch-site': 'same-origin',
            'user-agent': 'Mozilla/5.0 (Macintosh; Intel Mac OS X 10_15_7) AppleWebKit/537.36 (KHTML, like Gecko) Chrome/124.0.0.0 Safari/537.36 OPR/110.0.0.0',
        })

        if transcript_response.status_code == 200:
            # Save the transcript content to a file
            with open(f'{clean_title}.html', 'w') as file:
                file.write(transcript_response.text)

            print(f'Saved transcript: {clean_title}.html')
        else:
            print(f'Failed to retrieve transcript: {full_url}')
else:
    print(f'Initial request failed: {response.status_code}')
The process of scraping Motley Fool’s Earnings Call Transcripts is a two-step process:
1. Scrape Titles and Links: First, we scrape the pages that contain the titles of the transcripts along with the URLs. This is done by making requests to the API endpoint, which dynamically loads additional titles as we navigate through the pages. The HTML content for each page is extracted from the JSON response, and the URLs and titles are accumulated into a list.
2. Fetch Full Transcripts: Once we have the list of titles and URLs, the second step is to visit each transcript URL to retrieve the full content. For each URL, a request is made, and the complete transcript is fetched and saved to a file, named after the transcript title.
This two-step process enables us to gather both the transcript titles and their corresponding full content for further processing or storage. The step-step development is presented in this companion Kaggle notebook. A more detailed breakdown of steps is as follows:
- Session Initialization and Cookie Setup: A
requests.Sessionobject is used to automatically manage cookies. The session is created, and an initial request is made to the URL to set the necessary cookies. - Fetching and Accumulating Content: The script loops through a specified number of pages, fetching HTML content embedded in a JSON response. The content of each page is extracted from the
htmlkey, unescaped, and then accumulated into a single HTML string. - Parsing the Combined HTML: The combined HTML content of several pages is then parsed using
lxml.etree.HTMLto extract the capsules, one for each transcript title. - Extracting URLs and Titles: The script iterates through each capsule, unpacking the title of each transcript and the accompanying metadata which includes the URL link to the full document.
- Fetching and Saving Transcripts: With each transcript URL thus obtained, the full document is fetched and saved to a file named after the transcript’s title.
This process lays the foundation for building a scraper or spider to automatically collect and store transcripts.
Scrapy Session Downloader Middlewares
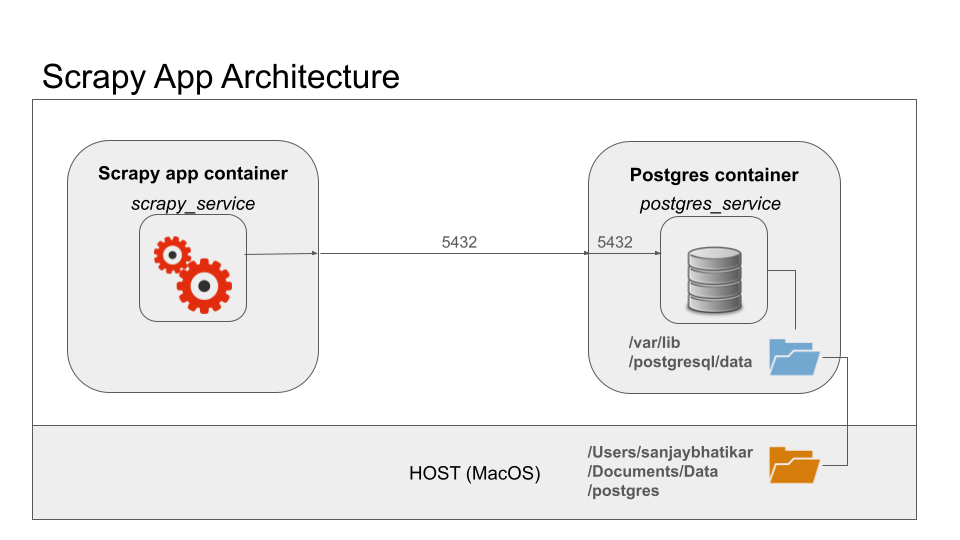
The implementation of a spider in Scrapy to crawl the web is illustrated in the fig.
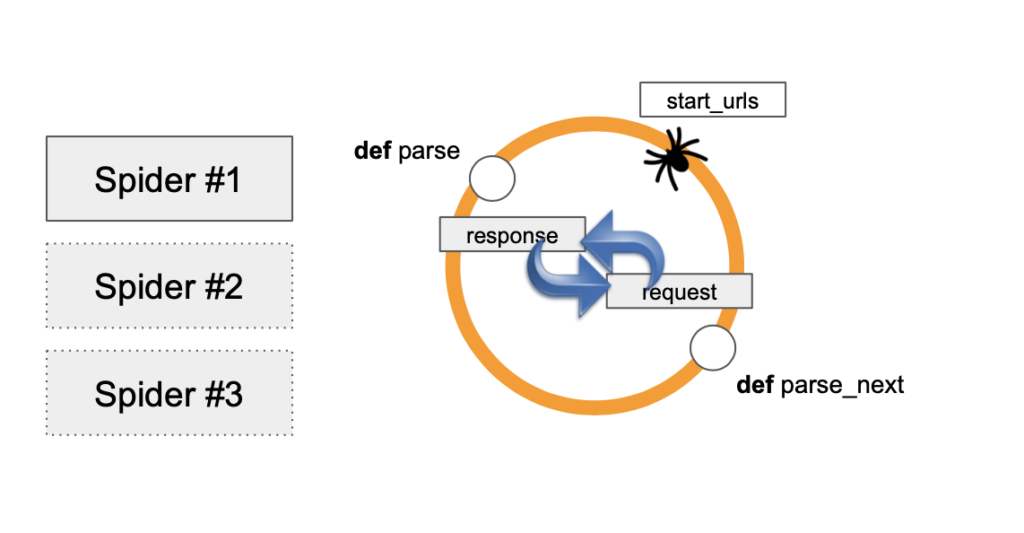
Here’s how Scrapy crawls the web:
When a Scrapy spider starts, it is provided with one or more start_urls, which is an attribute of the spider class. For simplicity, let’s assume there’s just one URL in start_urls. Scrapy sends a request to this URL, and the response is passed to the spider’s parse method.
In the parse method, the content of the response is processed, and this triggers additional requests for links found in the page. These follow-up requests are handled by callback functions, which are also defined as class methods. This process allows the spider to recursively follow links and scrape multiple pages across a website.
Scrapy uses asynchronous I/O, which means it can handle multiple requests concurrently rather than sequentially. This is evident from the use of the yield keyword instead of return in the `parse` method and its callbacks. By yielding requests, Scrapy doesn’t wait for each response before sending the next request, making the crawling process much faster.
One key benefit of Scrapy is that it automatically handles the initial request(s) defined in start_urls. You don’t need to explicitly make the first request in your code; Scrapy manages this, and the response is directly passed to the parse method. If there are multiple start_urls, Scrapy invokes the parse method once for each response, and the responses are handled in the order they are received.
Scrapy can also handle common scraping scenarios, such as pagination, where the parse method may be recursively called to fetch the next page as long as there is a “next” link. Scrapy supports both XPath and CSS selectors for parsing HTML, making it highly flexible in extracting content.
In our Kaggle notebook, we used a requests.Session object to manage cookies automatically. But how does Scrapy handle session management? Let’s explore how Scrapy manages cookies and sessions to ensure consistency in requests.
We do it using a middleware component that comes with Scrapy. This is the CookiesMiddleware. According to Scrapy docs:
This middleware enables working with sites that require cookies, such as those that use sessions. It keeps track of cookies sent by web servers, and sends them back on subsequent requests (from that spider), just like web browsers do.
We use the middleware component, enable it in “settings.py” as follows:
	# Enable or disable downloader middlewares
# See https://docs.scrapy.org/en/latest/topics/downloader-middleware.html
DOWNLOADER_MIDDLEWARES = {
   "bookworm.middlewares.BookwormDownloaderMiddleware": 543,
   "scrapy.downloadermiddlewares.cookies.CookiesMiddleware": 345
}
We also need to enable cookies like so:
	# Disable cookies (enabled by default)
#COOKIES_ENABLED = False
COOKIES_ENABLED = True
COOKIES_DEBUG = True
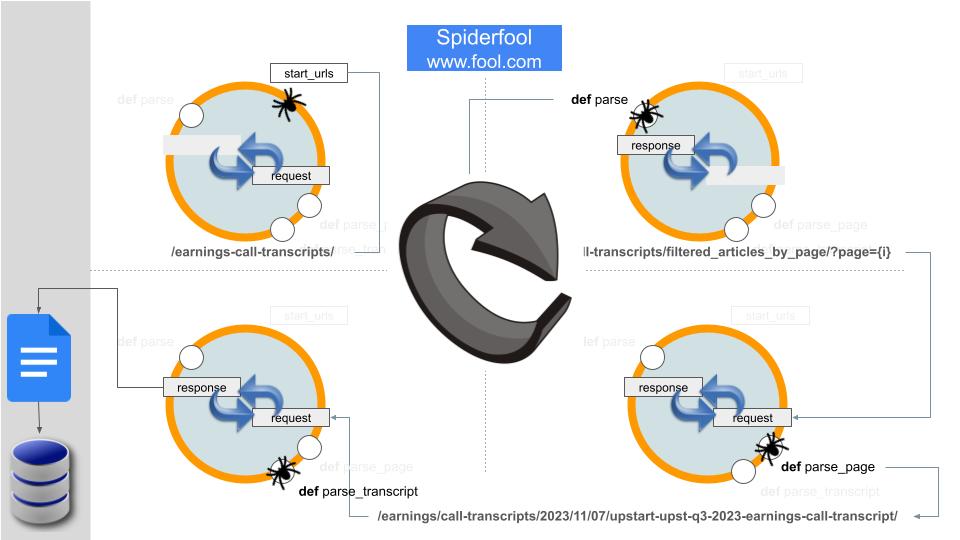
Here’s a clearer explanation of how the Scrapy spider crawls The Fool:
- Request the Landing Page: Scrapy starts by requesting the landing page of The Fool. Cookie is set here. As such, no content of the landing page is consumed.
- Parse Landing Page: The response is passed to the
parsecallback, where in departure from convention, the page URLs are synthetically generated and each page requested. Note that in yet another departure from convention, a page URL is a REST API endpoint with JSON response. - Handle Page Responses: Each JSON payload from step 2 is passed to the
parse_pagecallback. The JSON has the HTML content of a single page stashed under the keyhtml. The HTML is extracted, cleaned, and parsed to yield the titles of full transcripts (20 per page), each with accompanying URL to the document. Iterates over the set of URLs triggering the next wave of requests. - Handle Transcript Responses: The response from each request in step 3, is passed to the
parse_transcriptcallback. This response contains HTML from which the full text of an earnings call transcript is scraped. - Pipeline Processing: The Scrapy pipeline is then used to store the scraped transcript for further processing or saving.
With session management handled by the Scrapy middleware, The Fool’s extensive collection of earnings call transcripts is now ready for scraping and storing.
Conclusion Key Takeaways
AI/ML projects depend on good quality data. When we scrape information from the web to construct datasets, we rely on spiders to crawl the web efficiently and purposefully. However, each website is uniquely constructed and the manner of its construction can put barriers in the way of scraping. The Fool, a web-site with data upon financial markets, presents a case-study of the kind of challenges that crop up. We have shown how challenges posed by session cookies can be handled with ease and elegance in Scrapy using middleware. The lessons are broadly applicable to scraping sites that use cookies in browser sessions.